


Practical knowledge 03 · Processing & installation
Cut cleanly. Connect securely.
Pitch, LED spacing and cooling explained clearly – with installation drawings and tips for correct processing.
This is how the strip is protected.
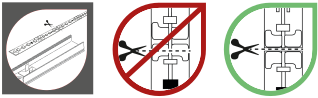
Cut at the right point.
Use the intended separation point. The drawing shows an SMD strip with marked contacts; the grid is specific to the version.
Enlarge drawing
Solve the corner with one connection.
Short, matching connection cables allow the change of direction without a sharp kink in the strip PCB.
Enlarge drawing
Handle components with care when pressing in.
Do not press on individual LED chips. Installation forces must not damage components and solder joints.
Enlarge drawing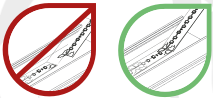
Lay without sharp kinks.
Guide the strip gently and avoid sharp kinks. Observe the permissible bending radius of the respective design.
Enlarge drawingDuring processing, observe the cut marks, bending radii and connection specifications of the respective version.
Three distances, three different tasks.
| Term | Meaning | Planning question |
|---|---|---|
| Pitch / cut dimension | Spacing of permissible cut points | In what increments can I shorten the strip? |
| LED or light-point spacing | Spacing of adjacent light points | How does the strip perform with this cover and profile depth? |
| Digital pixel/group spacing | Spacing of independently controllable units | How finely can the control render a gradient? |
A digital pixel can consist of one LED or several jointly controlled LEDs. LED density alone therefore does not prove digital resolution. Even with COB and Free Cut, light effect, cuttability and connection grid must not be equated.
From the roll to the finished line of light.
- Plan. Define lighting effect, protection rating, length, profile, cover, feed-ins and maintenance access. Compare the series options with the specific installation location.
- Check. Unroll the strip completely. Check voltage, polarity and control before installation. Do not operate a coiled strip.
- Prepare. Clean and dry the substrate and check it for sufficient load-bearing capacity and heat dissipation. Remove swarf and sharp edges.
- Shorten. Switch off the supply. Cut only at the points approved for the specific version; round down to the permissible grid.
- Connecting. Match contacts and pole count correctly. Use the specified connection technique and do not subject solder joints to mechanical stress.
- Install. Lay without tension, twisting or kinks. Do not press on LED housings. Observe the bending direction and permissible radius of the version.
- Close and check. Seal protected ends professionally. Relieve strain on connections; check function, dimming and thermal behaviour of the finished build-up.
Even with LEDs, heat is a planning issue.
LED strips generate heat. A suitable aluminium profile can absorb and dissipate it. However, contact surface, strip power, profile cross-section, air movement, cover and the actual installation situation are also decisive. Bonding onto wood or plastic does not offer the same heat dissipation.
Heat build-up under insulation, a tightly enclosed cavity or a protective sheath can raise the temperature. Observe the prescribed Tc/Ta limits and the cooling information for the version supplied. The adhesive layer does not serve as proof of thermal suitability.
Length change in profiles and covers.
Aluminium and plastic expand differently with temperature changes. When cutting and installing, allow for the system-specific movement clearance at ends and transitions. Do not clamp covers between rigid stops; the required gaps depend on material, length, temperature and type of installation.
Installation documents & drawings.
Protection ratings & ambient conditions
Selection guide for coating, tube and potting as well as moisture, UV, salt and chlorine.
Download PDF Processing in detailFrom planning to commissioning
Work steps, assembly drawings and typical errors clearly explained.
Read the installation notesOperating and installation instructions as PDF
Notes on cutting, connecting and installing LED flex strips. When selecting the protection rating and intended area of use, also observe the notes under "Protection ratings & environmental conditions".
Download PDF